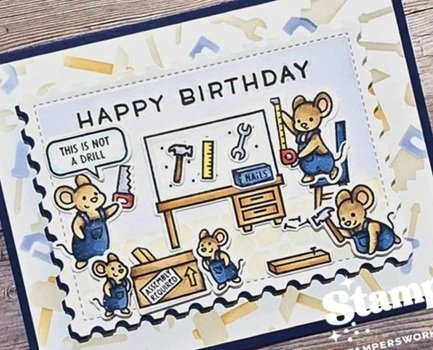
Hi everyone! Today I am sharing a birthday card I made for a friend. I thought the Mice Tools range from Lawn Fawn would be perfect as he is a jack-of-all-trades. I modelled this card after the one I made for Al for his birthday (see here). I recently picked up the new Tool Time stencil from Lawn Fawn and thought it would create a cute background.
Building the Scene
To create the card, I started by using the Tool Time stencil on white cardstock. I used Lawn Fawn’s Manatee ink for the metal parts (although I think I grabbed the wrong blending brush because it has a slight brown tinge to it). Next, I added navy blue ink for the handles. I thought about using different colours, but in the interest of simplicity, I stayed with one colour. I tried to keep a light hand as I didn’t want it to be too dark and potentially overpower the scene. In hindsight, I probably could have gone a little darker, so maybe I will try that next time.
I created a card base from navy blue cardstock and then trimmed the stencilled cardstock to fit, so only a narrow border of the navy was visible.
Next, I used the Postage Stackables (Lawn Fawn) to die-cut my focal panel from white cardstock. I then used the coordinating Postage Rectangles stencils to add some shading to this piece. I wanted to create the wall/floor look again, so I used the Cobblestone stencil for the floor — again with Manatee ink (which still looked slightly brown-tinged) — and a very soft layer of navy blue ink for the wall. I die-cut another of the Postage Stackables dies from navy blue cardstock so I could layer the white piece on top. I offset it so only a little bit of the blue showed on the left and bottom side. I did need to trim just a little from the top and right side.
After stamping the sentiment from the Simply Sentiments stamp set, I popped this panel up on my card base with some foam adhesive. I was going to hand-deliver this card, so I didn’t have to worry too much about the extra depth.
Next, I arranged the mice around the focal panel. I had previously stamped, coloured, and die-cut the pieces. Some were adhered directly to the focal panel, and others were popped up with foam adhesive. I added some Wink of Stella to their overalls. I don’t know why every card needs some shimmer but… every card needs some shimmer!
The last thing I did, and you might be able to tell it was a late addition, was to add the “This is Not a Drill” sentiment. Al had really liked that pun, so I thought this recipient might too.
Here’s the card…

I guess, like some of you, I do not always create cards with a specific person in mind. There are lots of reasons for that – sometimes there is no time, and sometimes I just feel like creating for the sake of creating. Regardless, I think there is still something pretty special about a handmade card. I gave this card to the recipient yesterday, and his immediate reaction was “oh, that is perfect for me”, which honestly felt like the best possible response.
Hope you have a wonderful day! Thanks so much for stopping by!

Supplies
(DISCLAIMER: I am a member of various affiliate programs. However, I purchased all the items used in my projects myself. I only link to products I personally use, love, and recommend (though I may link to different sizes). If you click on my link, I may receive a small commission at no extra cost to you. Thank you!)


